Thursday, September 28, 2017

Signs, signs, signs!


This weekend I did a little back patio make-over.  I added fence around our strawberry/blueberry patch and around the flower bed to help keep the puppy and kids out.  I added some mulch and painted some rocks to add to the high level of cuteness and then... realized my patio decor is LACKING!  So I did what I do and whipped up some cute signs to help tie it all together. 


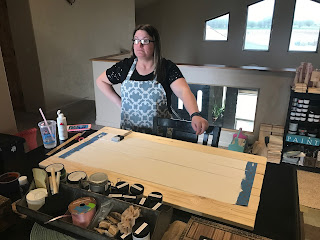
I had thought about using bright summery colors like teal, coral, bright blue but then realized that our house is tan and I painted both sets of french back doors red with brown trim last summer so I used my Chalky & CO paints and products (THAT I LOVE!) to paint the signs in neutral and matching colors.  I stained all of the boards with Spanish Willow (black) and then applied our beeswax bar around the edges and sporadically over the surface to allow for easy distressing after they are painted.  Then I painted them in Vintage White, cut custom stencils and painted the lettering Moosehide Brown and the flower, bee and butterfly with our Apple Spice.  I applied Flat Velvet Top Coat over it all to keep it protected in the sun and heat.  I am so happy with the way our little "oasis" is coming together and love spending time on the patio with our family.  

If you would like any of these or other customized signs for you patio contact me to place an order or request a quote.  Thanks for stopping by and have a great day! 


Tuesday, August 15, 2017

Creating Pinterest Board Covers


Hello friends!  I had a bit of a cold last week (Yes a cold in the middle of summer!!) so as I was laying in bed feeling awful and having no voice I decided to do a little project during my down time.  

I created matching Pinterest board covers for all of my boards.  I love that my profile now has an attractive theme that visually carries throughout each board.  It was easy to do and I love how it turned out!  I posted a picture of the finished project on one of my Facebook groups and had a friend ask how I had done the covers so I thought I would share in case any one else wanted to jazz up their Pinterest profiles. 


Step 1:  Create your graphics.

I used the Canva app to create my graphics. I googled paisley photos and found one that I liked.  I screen shotted the pattern and used it as my background.  I chose a Poster design in Canva so that the image would be long enough to show up as a large pin and not a small one.  If you choose a square or short photo your album cover will show up as a small pin like those on the right in the photo below.


Step 2: Pin your graphics. 

After I created a graphic with text (a title and short description for the board) I would save the image.  I then went into my photos and selected the image and pinned it to the appropriate board.


Step 3: Edit your pin.

Next I opened Pinterest and clicked on the pin I just pinned.  Click on the little pencil in the top left corner to edit the pin.  Fill in the info like description and such.  In the Website section add the URL from the board that you pinned it to.  This will redirect anyone who clicks on this pin to your board
 
.  
Just copy the URL from your browser bar and paste it to the website section.  Click done!


Step 4: Save Pin as Board Cover.

Open the board.  Click on the little pencil in the top left corner.  Click on Change next to cover. Center your image and click Save Changes.  


Voila!  You have created and saved a cover to your Pinterest board. 

I hope this helps!  Thanks for stopping by and happy pinning! 


Tuesday, June 27, 2017

Faux Rust Effect


Way back in March I received a $20 Hobby Lobby gift card for my birthday for my awesome little sister.  About a month ago I went into the store and finally used the card.  I purchase this amazing little kit...


I had no idea what I wanted to paint with the kit but I had attended an faux rust painted class last December and know that I loved the look.  About 2 weeks ago I was strolling through Michael's and found (IN THE CLEARANCE SECTION!!) several compressed cardboard cutouts for <$2 each.  I thought, "This is the perfect material to practice my painting technique."  I grabbed several of the cutouts and got busy painting.  The products are very easy to use and effective.  I painted all of the items that you see in the picture at the top of this post and still half 1/2 full bottles. 


I liked this kit so much that I went back and purchased the Rust Finish Kit also!  I am excited to try out this color perhaps mixed with some of the green patina.  The possibilities are endless.  

Thanks for stopping by and have great day.  


Tuesday, April 25, 2017

Custom Bath Trays


I was asked by a friend awhile back to build and paint a custom bath tray for her.  I said, "Of course I can!"  I built one for myself and 2 for friends.  They are super cute and I LOVE LOVE LOVE using mine! I love it so much that I decided to add it to my line of custom made products.  


These are made to order to ensure they fit your tub and style.  Just give me your tub width and choose your paint or stain colors.  You can add a word, phrase and/or choose from several shapes/designs.  It's all up to you!


You can choose to have a wine glass slot or not.  I have stemless glasses so mine doesn't have the slot.  You can also choose to add handles or knobs.  Personalize it to fit your needs!  These trays are just $25 (without knobs/handles) and are available to ship out in just 24 hours.  Contact me to order yours! 

Thanks for stopping by and have a great day!


Tuesday, March 28, 2017

Classes Classes Classes!


One of the services that I provide is that I hold DIY classes that allow guests to learn and create a new craft.  I LOVE LOVE LOVE doing these events.  It can be a class of 4 people or 24 people and it is fun every time.  I love creating and crafting and greatly enjoy sharing that experience with friends and enjoy making new friends in the process!  

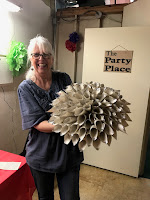
Our last class was one of the DIY Paper Dahlia classes and it was so fun!  Here are a few pictures of guests and their projects. 
 

Before that was our St. Patrick's Day Decor painting class.  I loved it so much that I made 1 of each design for myself! 


We can also do custom signs of the guest's choice.  My favorite little sister just did this cute Wyoming themed sign. 


I have several classes scheduled for April and May and will have more to come this summer as well!  

Garden Wands I made last weekend. 


If you are interested in attending any of these classes contact me!  To receive updates on future classes, sales, and more like my Facebook page.  

Thanks for stopping by and have a great day! 


Monday, March 13, 2017

Colorado Flag Wall Art


I am loving these Colorado Flag Wall Art that I made last weekend.  I made three different sizes and all are available inside my booth at Crafts & More.  They are gorgeous pieces of home decor and would make excellent Mother's day, graduation, Father's day, wedding, or house warming gifts! 

I started off by selecting and cutting my lumber to length. 

Then I applied a layer of Chalky & Company Blue Steel Gel Stain for the blue stripes. 

Then I painted on a layer of Chalky & Company Les Blues Glaze to brighten the blue just a bit.

After this I grabbed my handy dandy protractor and drew two circles inside one another.  I painted the entire inner circle yellow and then the majority of the outer circle red to form the iconic "Colorado C".


I think they are adorable!  What do you think? Visit the store or contact me to purchase or special order your Colorado Flag wall art.  Available in a variety of sizes and finishes!  

Thanks for stopping by and have a great day!


Monday, March 6, 2017

Paper Dahlias


Hello friends! My latest (indoor) project was this large paper Dahlia.  We had a windy weekend so I spent my time inside the house creating this little beauty.  I love how it turned out!  I also love how easy it was!  I loved it so much that I am offering a class at the store in just 2 weeks to make them!  Learn more here

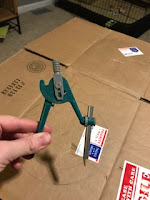
Step 1:  Cut out a cardboard backing for the flower from scrap cardboard.  I had a few boxes in the garage and just cut it from that. I used my protractor to draw my circle as well as some interior circles as guide lines.  


Step 2: This part was surprisingly hard for me but I made it through.  Tear out your book pages.


Step 3: Roll up the book pages and start gluing!  I placed 4 pages at each "corner" (yes I KNOW circles don't have corners but you know what I mean!) as guides to help keep the line going straight.  


Step 4:  Keep on gluing!  I then just filled in the center pf the flower.  Roll, glue and repeat until complete. 


I hung this guy up in our master bedroom and he looks great on our gray (or is it grey?) walls. 


Join me at the store on March 24th at 6:00pm to make your own! All materials and supplies provided.  Cost is just $20 per person and room is limited so RSVP to me by March 22nd. 

Thanks for stopping by and have a great day!